Your First Stream Checklist: What to Do Before, During and After
Quick answer: most first-stream problems (no audio, a black screen, a frozen stream) are found in a private test the day before. Build four scenes, record a 2-minute test, check your audio meters, and run a short test stream. On the day, restart the PC, plug in Ethernet, turn off notifications, and go live. Afterwards, watch the VOD and fix one thing.
The timeline
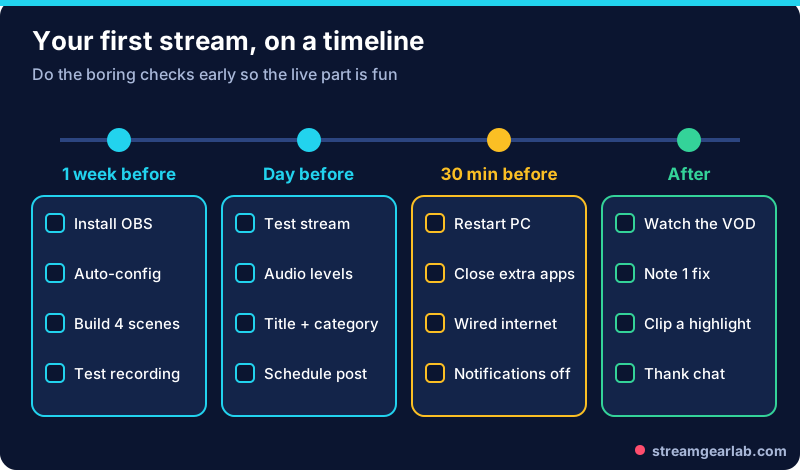
One week before: set up
- Install OBS Studio from obsproject.com and run the Auto-Configuration Wizard (Tools menu). New to OBS? Start with our OBS setup for beginners.
- Pick your platform and connect it in Settings → Stream. Still deciding? See Twitch vs YouTube vs Kick.
- Choose settings that fit your upload speed. The Bitrate Calculator gives you a safe number.
- Build four scenes (below) and give each a hotkey.
- Add noise suppression to your mic. Our noise guide takes ten minutes.
- Record a 2-minute test and watch it back. Check that your voice, the game sound and the picture are all there.
The four scenes to build
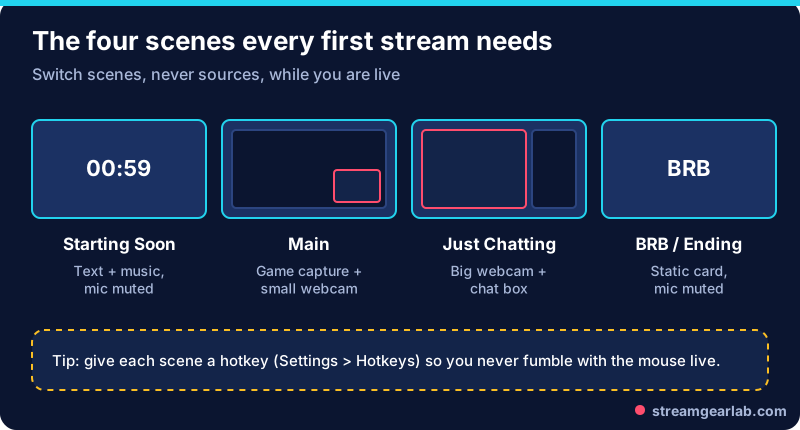
| Scene | What’s in it | Mic |
|---|---|---|
| Starting Soon | Text card, optional music, countdown | Muted |
| Main | Game or screen capture, small webcam, alerts on top | On |
| Just Chatting | Large webcam, chat box | On |
| BRB / Ending | Static card, “thanks for watching” | Muted |
For alerts and overlays, follow our alerts and overlays guide. Keep the first stream simple. Alerts can come later.
The day before: test everything
- Run a test stream. On YouTube, set the stream to Private or Unlisted. On Twitch, do a short test at a quiet hour. Watch it on your phone over mobile data.
- Check the audio levels. The OBS audio guide suggests keeping speech in the upper yellow zone, just touching the start of the red. Game sound belongs lower in the yellow, and music and alerts in the green.
- Check the OBS Stats dock for dropped or skipped frames. If you see them, our dropped frames guide helps.
- Set the title, category and tags, then post your schedule.
- Turn on past broadcasts (VODs) in your platform settings so you can review the stream.
30 minutes before: go-live routine
- Restart the PC, then open only OBS, the game, and chat.
- Use Ethernet if you can. Pause big downloads, cloud backups and game updates.
- Turn on Do Not Disturb / Focus. Close any window with your email, stream key or personal information.
- Do a 10-second mic check with a local recording.
- Have water nearby, and open your Starting Soon scene before you click Start Streaming.
During the stream
- Talk even when chat is empty. Explain what you’re doing and why. VOD viewers and lurkers count too.
- Switch scenes, not sources. Use your hotkeys rather than editing sources live.
- Mark good moments. Twitch lets you add stream markers, which make highlights easier to find later.
- End on purpose. Switch to the Ending scene, thank people, then stop the stream.
After: review and fix one thing
| Check | What to look for | Where to fix it |
|---|---|---|
| Audio | Voice too quiet against the game, background noise | Audio Mixer, filters |
| Video | Blocky motion, dropped frames | Output bitrate, resolution |
| Pacing | Long silent stretches | A rough plan of topics |
| Discovery | Did the title say what the stream is? | Title and category |
Pick one fix per stream, not ten. If you’re aiming for Twitch Affiliate, log each stream in the Twitch Affiliate Tracker to watch your progress.
Frequently asked questions
How long should my first stream be?
Long enough to settle in, and short enough to stay relaxed. One to two hours is a common starting point. Being consistent matters more than length.
Should I tell people it’s my first stream?
Yes. It’s honest, it starts conversations, and viewers tend to be kind about small mistakes.
What if nobody shows up?
That’s normal for new channels. Treat it as recorded practice: talk through the stream, then clip a highlight to share.
Do I need a webcam for my first stream?
No. Plenty of streams start with voice only. Good audio matters more than having a camera.