How to Fix Dropped Frames in OBS: A Step-by-Step Network Checklist
Quick answer: in OBS, “dropped frames” means your connection couldn’t deliver the video to the platform in time. The OBS team says it is extremely unlikely to be caused by OBS itself. Plug in Ethernet, set your bitrate to about 75% of your real upload speed, and try a different ingest server. Those three fixes solve most cases. The rest of this guide covers the order to try things and what to do when they don’t work.
Step 1: Check that it really is dropped frames
Open View → Docks → Stats and stream for a few minutes. OBS has three different “lag” counters, and each one has a different fix:
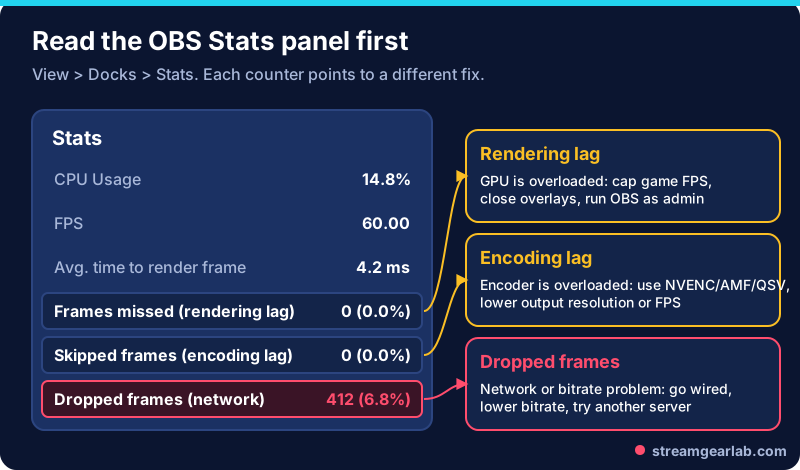
| Stats counter | What it means | First fix |
|---|---|---|
| Dropped frames (network) | Upload can’t keep up | This guide: wired, lower bitrate, change server |
| Skipped frames due to encoding lag | The encoder is overloaded | Switch to a hardware encoder (NVENC, AMF, QSV) or lower resolution/FPS |
| Frames missed due to rendering lag | The GPU is overloaded | Cap the game’s FPS, close GPU-heavy overlays |
If only the encoding or rendering counter climbs, a network fix won’t help. Start with OBS settings for laptop streaming instead. It covers lighter encoder and resolution choices.
Step 2: Switch from Wi-Fi to Ethernet
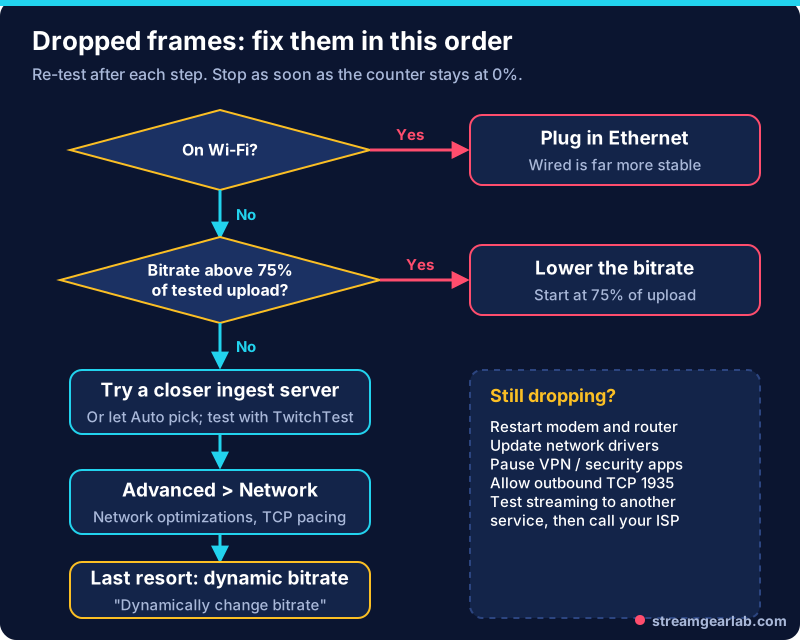
The OBS knowledge base recommends a wired connection. Wi-Fi speed tests can look fine while short drop-outs still lose frames. A single Ethernet cable from the router to your PC is the cheapest fix on this list. If the router is in another room, a long flat cable or a powerline adapter is still usually more stable than Wi-Fi.
Step 3: Set your bitrate to 75% of real upload
OBS suggests starting at about 75% of your upload speed. Run a speed test at the time of day you usually stream, and use the lowest result you see, not the best.
| Tested upload | Max stream bitrate (75%) | Sensible Twitch setting |
|---|---|---|
| 4 Mbps | 3,000 kbps | 720p30 |
| 6 Mbps | 4,500 kbps | 720p60 or 1080p30 |
| 8 Mbps | 6,000 kbps | 1080p60 |
| 10+ Mbps | 7,500 kbps | 1080p60 at 6,000 (Twitch’s guideline) |
Set it in Settings → Output → Streaming → Bitrate, with rate control on CBR as Twitch and YouTube recommend. Not sure which resolution goes with your bitrate? See 1080p60 vs 720p60: which stream settings to use.
Free tool: The Upload Speed & Bitrate Checker does this math for Twitch, YouTube and Kick, and the OBS Settings Generator turns it into a full list of settings to type in.
Step 4: Try a different ingest server
Sometimes the problem is the route to the platform, not your connection. In Settings → Stream, pick a different server close to you, or let OBS choose automatically. On Windows, the OBS knowledge base points to TwitchTest, a free tool that measures the quality of each Twitch ingest from your connection. If you use Twitch’s Enhanced Broadcasting, the knowledge base suggests testing with it turned off, or with a Maximum Streaming Bandwidth set.
Step 5: Try OBS’s network settings
Go to Settings → Advanced → Network:
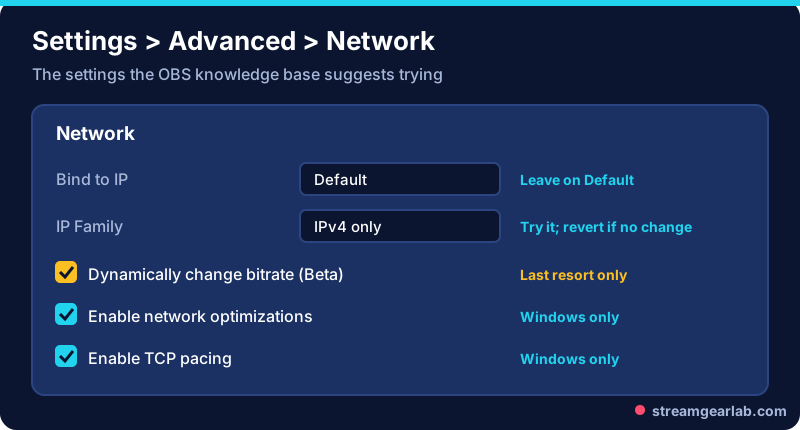
- Bind to IP: leave on Default.
- Enable network optimizations and Enable TCP pacing: available on Windows only. Try turning them on.
- IP Family: try IPv4 only, and switch back if it makes no difference.
- Dynamically change bitrate to manage congestion (Beta): OBS lowers your bitrate when the connection struggles. Treat it as a last resort. It hides the problem by making the picture blurrier instead of fixing it.
Step 6: Rule out the rest of your network
If frames still drop:
- Restart your modem and router.
- Update your network adapter drivers.
- Pause your VPN, firewall or security suite for a test stream. Some of them interfere with streaming traffic.
- Make sure outbound TCP port 1935 (RTMP) isn’t blocked.
- Check whether anyone else on the network is uploading, such as cloud backups or game updates.
- Stream to a different service as a test. If that drops too, the problem is your line, so contact your ISP and say “upload packet loss” rather than “slow internet”.
Frequently asked questions
Is OBS causing my dropped frames?
Almost never. The OBS knowledge base says dropped frames come from an unstable connection or a bitrate your upload can’t sustain. Encoding and rendering lag are the counters that point to your PC.
How many dropped frames are acceptable?
Aim for 0%. A handful during a brief network hiccup isn’t worth chasing. A number that keeps climbing during the stream means viewers are seeing stutter and buffering.
Will a better PC fix dropped frames?
No. A faster CPU or GPU helps with encoding and rendering lag, not network drops. Spend on a cable or a better internet plan first.
Should I lower resolution or bitrate first?
Lower the bitrate, because that is what has to fit your upload. Then pick the resolution and frame rate that look good at that bitrate. Our OBS setup guide for beginners covers where each setting lives.